5-Axis Air Bearing Optical Measurement Metrology Platform

OptiPro Systems, a well-respected optical machine manufacturer, contacted ABTech thinking that they simply needed a supplier of air bearing stages to enable them to develop a prototype metrology station. When the dust settled, they left with a complete motion system.
The reason was simple: core competencies. We didn’t set out to up-sell OptiPro. We set out to ensure that their problem was solved. The best path to that solution was leveraging OptiPro’s core competencies in optics and ABTech’s core competencies in air bearing-based metrology systems.
What OptiPro discovered was similar to what many successful companies find: even though you can build something doesn’t mean you should. Without focused expertise, projects invariably take longer and cost more than estimated. This often renders the “let’s do it ourselves” decision far less financially attractive than is first thought.
And that’s before taking into account the potential financial losses associated with longer-than-expected development schedules. A delay in time to market can not only be financially costly, it also risks losing market position.
When the pros and cons are objectively weighed, more times than not, retaining experts in a field to assist is typically the best business decision financially, and from the standpoint of resource allocation.
So leveraging OptiPro’s knowledge in optics as a framework, we combined our expertise in multi-axis motion and geometric measurement principles to propose the design, manufacture, and certification of a complete motion platform. OptiPro was delighted with the result.
It is interesting to note that we were up against some substantial competition for the project. Mike Bechtold, the President of OptiPro Systems described the vendor selection process as follows:
“We interviewed three potential candidate companies for our 5-axis UltraSurf non-contact metrology system. Although ABTech was the smallest of the three, we felt that their experience, engineering team and product knowledge was at the top of the list. Just as important to us was having a partner willing to work with us from our beginning concepts and design to the final product. By combining our ideas with their existing high precision air bearing slides and rotary axes, we worked together to develop what we believe is the best possible solution for non-contact measurement of optical components in the world today. Communication is key and they understand it. Great people to work with!”
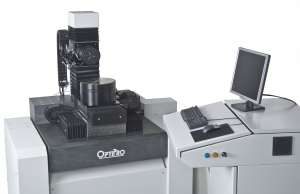
The end deliverable was six ultra-precision designed prototype metrology station. Each axes has a direct drive motor and high-resolution encoder to help achieve rotary error motion of ±1 arc second over a 360° move, and linear accuracy of ±1 micron over 8 inches of travel in the X, Y and Z directions.
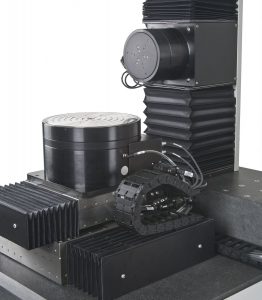
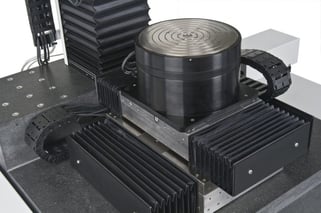
The 10 inch (250 mm) rotary air bearing table with dual read heads is mounted on stacked X-Y linear air bearing stages. The vertical Z-axis linear air bearing with ceramic rail supports a face-mounted 4 inch (100 mm) rotary air bearing and is counterbalanced over an air bearing roller sleeve. The bi-level precision granite base is suspended on air bags on a vibration isolation stand to reduce outside interference.


System Feature Summary
- Compact and uncluttered design with 5-axis motion
- Granite, ceramic and steel materials and Invar linear scales for thermal stability
- X-Y linear stages with vertical stiffness greater than 1 million pounds/inch
- Rotary error motion: ±1 arc second total over 360° move
- Accuracy: ±1 micron (±40 micro-inches) over 8 inch (200mm) linear travel in X, Y and Z directions
- Renishaw encoders and dual Signum 5 nm resolution read heads to eliminate odd error harmonics
Download Renishaw’s case study on ABTech’s 5-axis system for OptiPro Systems


